How to Install an Exterior Foundation Drain That Lasts Forever
How to Install an Exterior Foundation Drain
When it comes to maintaining the structural integrity of your home, one of the most important factors is ensuring proper drainage around your foundation. Without a reliable drainage system, water can infiltrate your home’s foundation, leading to a host of costly and damaging issues, including cracked walls, mold growth, and even structural failure. This is especially true in areas like Denver, Colorado, where seasonal rain and snow can wreak havoc on homes that lack proper drainage systems.
In this blog post, we’ll guide you step-by-step through the process of installing an exterior foundation drain that will last for many years to come. This guide is designed for homeowners, contractors, and DIY enthusiasts interested in learning how to protect their home’s foundation by installing an effective and long-lasting foundation drain. By following the tips and techniques outlined below, you can ensure that your property is well-protected from water damage, saving you from expensive repairs down the line.
Ernie’s Gutter, a third-generation family business based in Denver, Colorado, has been serving the community since 1978. With extensive experience in roofing and gutter installation, we also specialize in foundation drainage systems, providing homeowners with the best solutions for protecting their property.
Why is Foundation Drainage Important?
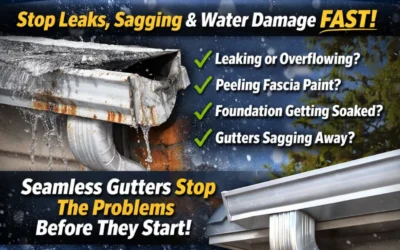
Water damage is one of the leading causes of foundation issues in homes. When water collects around the foundation, it can cause serious structural damage over time. The pressure from water buildup, combined with the weight of the soil, can lead to cracks in the foundation, basement flooding, mold, and more. To prevent this, a proper drainage system must be installed around the exterior of your home.

An exterior foundation drain system serves several key purposes:
- Redirects Water: It channels water away from the foundation, preventing it from seeping into the walls or basement.
- Prevents Soil Erosion: It helps prevent erosion that can cause the ground around the foundation to shift.
- Protects the Home’s Structural Integrity: It reduces the risk of cracks and settling caused by water accumulation.
- Avoids Mold and Mildew: Proper drainage prevents the buildup of moisture that can lead to mold growth.
- Increases Home Value: A well-maintained foundation can increase the value of your home, especially when potential buyers see that the property is free from water damage.
Planning the Foundation Drain System
1. Assess the Surrounding Area
The first step in installing a foundation drain is to assess the area surrounding your home. Look for areas where water tends to collect or where the ground slopes toward the foundation. Ideally, the foundation drain should be placed along the exterior perimeter of the house to redirect water that might accumulate around the base.
Additionally, consider the following:
- Tree Placement: If you have large trees within 30–70 feet of the foundation, their roots can invade your drainage system, clogging the pipes and causing long-term damage.
- Ground Slope: Ensure the ground slopes away from the foundation. If the slope is inadequate, you may need to re-grade the area before installing the drainage system.
- Utility Lines: Be mindful of any buried utility lines or electrical cables in the area where you plan to dig. It’s essential to contact your local utility company before digging to prevent accidental damage to these lines.
2. Select the Right Materials
Choosing the right materials is crucial to ensuring the longevity of your foundation drainage system. The main components of the system include:
- Drain Tile: Perforated PVC pipe is commonly used for foundation drains because it allows water to enter through the perforations and flow toward the drainage point.
- Filter Fabric: A soil filter fabric is used to surround the drain tile. This prevents sediment from entering the pipe and clogging the system.
- Gravel: Gravel is used to create a filter zone at the bottom of the trench, allowing water to flow freely around the pipe. A 3/4-inch round rock is ideal.
- Cleanouts: A cleanout allows easy access to the drainage system for future maintenance.
Step-by-Step Guide to Installing an Exterior Foundation Drain
Step 1: Remove Obstacles and Prepare the Site
Before you start digging, it’s important to clear the area around the foundation. Remove any trees, shrubs, or other vegetation within 30–70 feet of the house. Tree roots can infiltrate the drainage system, causing blockages and long-term damage.
Next, assess the grade of the surrounding soil. If the ground slopes toward the house, you may need to re-grade the soil to ensure water flows away from the foundation. This may involve removing excess dirt or adding new soil to create a gentle slope.
Step 2: Excavate the Trench
Now it’s time to dig the trench for the foundation drain. The trench should be at least 12–18 inches wide and deep enough to place the drain tile at the base of the foundation. Use a shovel or an excavator to dig along the perimeter of the house, being careful not to damage any utility lines. It’s a good idea to use a laser level to ensure that the trench slopes away from the foundation.
Step 3: Install the Gravel Base
Once the trench is dug, lay down a few inches of gravel at the bottom. The gravel helps create a filter zone that allows water to flow freely into the drain tile. The gravel also prevents soil from entering the system and clogging the pipe.
Step 4: Lay Down the Filter Fabric
Next, roll out the filter fabric over the gravel. The fabric serves as an additional barrier to prevent soil and debris from entering the drainage system. Be sure to overlap the fabric at the edges to create a seamless barrier around the gravel.
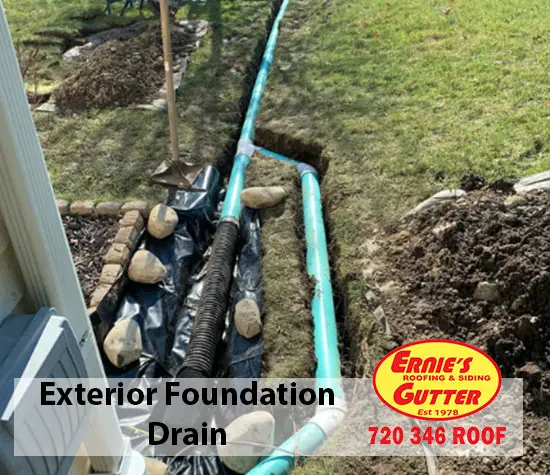
Step 5: Install the Drain Tile
Place the perforated drain tile on top of the filter fabric, ensuring that the holes face downward to allow water to enter. The drain tile should be installed along the entire perimeter of the house, just next to the footing. If you are using a double-piped system, as in the case of this installation, place one pipe for primary drainage and the second pipe as a backup.
Step 6: Wrap the System in Fabric
Now, it’s time to wrap the entire drain system in fabric. This is known as the “burrito wrap” method. The fabric serves as an additional layer of protection, preventing the gravel and soil from mixing and keeping the drain tile clean.
Step 7: Backfill the Trench
Once the drain tile is installed, cover it with more gravel, ensuring that the pipe is fully surrounded by gravel and fabric. Then, backfill the trench with the soil that was originally removed, leaving enough room for additional gravel on top to ensure proper water flow.
Step 8: Install Cleanouts
To make future maintenance easier, install cleanouts at strategic points along the system. Cleanouts provide easy access to the drain tile for clearing any blockages that may occur over time. This is especially important if your system is located far from the house or in an area that’s difficult to access.
Step 9: Finalize the Drainage System
To complete the installation, make sure the water flows away from the foundation and toward a proper drainage area, such as a storm drain or dry well. The system should be sloped at a gentle incline to encourage the water to move away from the house.
Finally, if your home is on a slab, a sump pump system should be installed to manage any excess water that the foundation drain may not be able to handle.
Tips for Maintaining Your Foundation Drain
A properly installed foundation drain system can last for decades, but like any system, it requires some maintenance to ensure it continues to function effectively. Here are a few tips for maintaining your foundation drain:
- Keep the Area Around the Drain Clear: Make sure that the area around the drain remains free of leaves, dirt, and debris that could obstruct water flow.
- Check for Tree Roots: Periodically check the drain system for signs of tree root intrusion. If you find roots near the drain tile, you may need to have them removed.
- Inspect Cleanouts: Cleanouts should be easily accessible and clear of debris. If you need to clear out the drain, use a plumbing snake or high-pressure water to flush the system.
- Regrade the Ground if Necessary: If the ground around your foundation settles over time, you may need to regrade it to ensure proper drainage.
Conclusion
Installing a foundation drain is a critical step in protecting your home from water damage and ensuring the long-term stability of your property. By following the steps outlined above and using high-quality materials, you can create a drainage system that will prevent water from collecting around your foundation and causing costly damage.
At Ernie’s Gutter, we’ve been serving the Denver area since 1978 with expert roofing, gutter, and foundation drainage services. If you’re considering installing or maintaining a foundation drain, our team of experienced professionals is here to help. Contact us today at 720-346-ROOF or visit Ernie’s Gutter for more information on how we can protect your home’s foundation.
By investing in the right drainage system, you’re safeguarding your property, your home, and your peace of mind for years to come. Don’t let water damage your home – take action today to install a reliable foundation drain that lasts forever!
OUR SERVICES
Your Neighborhood Roofing Contractor
Get more information concerning our service, do not wait to call us at 720 346 ROOF today. We’ll be more than happy to schedule a meeting with you.
Residential Roofing Contractor
Ernie’s Roofing specialize in residential roofing in Denver and have a team of experienced professional Roofers available to help you get the job done right The First Time. From minor repairs and maintenance to full–scale roof replacements,

Commercial Roofing
We construct, repair, as well as maintain Commercial Roofing systems for services both large and also small, creating personalized services that conserve our client’s time, cash, and also power. Call us at 720 346 ROOF and book a consultation today.

Hail Damage
Their knowledgeable staff is ready to help you assess the damage caused by storms and provide you with a comprehensive repair evaluation & plan. We specialize in all types of roof damage, including hail, wind, and even lightning strikes. Hail Claim Help

INSURANCE CLAIMS HELP
Our team of experienced insurance claim specialists will work with you to ensure that the insurance claim process is as stress-free as possible. We will work with your insurance company to provide all necessary documentation and estimates to ensure that your claim is processed quickly and correctly.

Wind Damage
When it comes to roof damage, it can be difficult to determine whether the damage was caused by hail or wind. While both types of damage can cause similar symptoms, they have different causes and require different repair methods.
What’s New on The Blog

Rain Gutter Repair Pferdesteller Park Denver
Rain Gutter RepairLatest News & Resources When you need a roof contractor you can rely on the team of experts at Ernie's Roofing. We specialize in a wide range of services from new construction, maintenance, and repairs for your home or business.Rain Gutter Repair...

Rain Gutter Repair Sloan’s Lake Denver
Rain Gutter RepairLatest News & Resources When you need a roof contractor you can rely on the team of experts at Ernie's Roofing. We specialize in a wide range of services from new construction, maintenance, and repairs for your home or business.Rain Gutter Repair...
Seamless Rain Gutter Installation Castlewood Park CO 80111
Seamless Rain Gutter InstallationLatest News & Resources When you need a roof contractor you can rely on the team of experts at Ernie's Roofing. We specialize in a wide range of services from new construction, maintenance, and repairs for your home or...
#1 Rated Roofing Contrator In Denver
Craftsmanship That Stands Like a House
Let’s Get Your Project on the Right Track

Let’s Get Started